

How do I create labels in a hockey pool?
Creating Labels allows teams to be filtered in the pool standings for simpler viewing. For example, if you are setting up a pool for a corporation, you might have regions and each region may have multiple branches or stores. You can assign a name (aka "label") to a region (e.g. "Alberta", "Ontario"). Then, when a team gets created within the pool, they can be assigned to a specific label.
This article explains how to create labels. To see how to assign labels to a team, please see this article.
Please follow these steps to create Labels for your pool:
1. Access the "Admin" menu
2. Select the "Roster" tab
3. Select "Labels" in the sub-menu
4. Click "+ Add Label" to add label
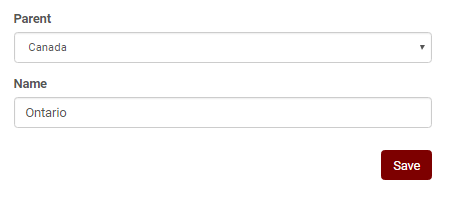
5. If you are going to have a hierarchy in your labeling, you will want to create your Parent label(s). We used "Canada" in the displayed example. To create a Parent label, DO NOT select a Parent from the Parent dropdown. Enter your desired Parent label into the Name field and hit "Save". Repeat for as many Parents as you have. If you are not having Parent labels (no hierarchy), you can disregard step #6.
6. Once you have created all of your Parent labels, you will then create the Children. Make sure to select the Parent from the Parent dropdown. Name your child label and hit Save. We used "Ontario" in the displayed example. Repeat for as many children labels as you have.
To apply labels to teams in your pool, please read this article


